How To Create API Server LoadBalancer for Kubernetes Cluster on 3Engines Cloud 3Engines Magnum🔗
Load balancer can be understood both as
- an external IP address through which the network / Internet traffic is coming into the Kubernetes cluster as well as
- the piece of software that decides to which of the master nodes to send the incoming traffic.
There is an option to create load balancer while creating the Kubernetes cluster but you can also create it without. This article will show you how to access the cluster even if you did not specify load balancer at the creation time.
What We Are Going To Do🔗
- Create a cluster called NoLoadBalancer with one master node and no load balancer
- Assign floating IP address to its master node
- Create config file to access the cluster
- In that config file, swap local server address with the actual floating IP of the master node
- Use parameter –insecure-skip-tls-verify=true to override server security
- Verify that kubectl is working normally, which means that you have full access to the Kubernetes cluster
Prerequisites🔗
No. 1 Hosting
You need a 3Engines Cloud hosting account with Horizon interface https://3engine.rootxwire.com/.
No. 2 Installation of the 3Engines command
To activate kubectl command, the 3Engines command from CLI 3Engines Interface must be operational. The first part of article How To Use Command Line Interface for Kubernetes Clusters On 3Engines Cloud 3Engines Magnum shows how to install it.
No. 3 How to create Kubernetes cluster using Horizon commands
The article How to Create a Kubernetes Cluster Using 3Engines Cloud 3Engines Magnum shows creation of clusters with Horizon visual interface. (In this article, you shall use it to create an exemplar cluster called NoLoadBalancer.)
No. 4 Connect to the Kubernetes Cluster in Order to Use kubectl
Article How To Access Kubernetes Cluster Post Deployment Using Kubectl On 3Engines Cloud 3Engines Magnum will show you how to connect your local machine to the existing Kubernetes cluster.
How To Enable or Disable Load Balancer for Master Nodes🔗
A default state for the Kubernetes cluster in 3Engines Cloud 3Engines Magnum hosting is to have no load balancer set up in advance. You can decide to have a load balancer created together with the basic Kubernetes cluster by checking on option Enable Load Balancer for Master Nodes in window Network when creating a cluster through Horizon interface. (See Prerequisite No. 3 for the complete procedure.)
The check box to enable load balancer for master nodes has two completely different meanings when checked and not checked.
Checked state

If checked, the load balancer for master nodes will be created. If you specified two or more master nodes in previous screens, then this field must be checked.
Regardless of the number of master nodes you have specified, checking this field on yields higher chances of successfully creating the Kubernetes cluster.
Non-checked state

If you accept the default state of unchecked, no load balancer will be created. However, without any load balancer “in front” of the cluster, the cluster API is being exposed only within the Kubernetes network. You save on the existence of the load balancer but the direct connection from local machine to the cluster is lost.
One Master Node, No Load Balancer and the Problem It All Creates🔗
To show exactly what the problem is, use
- Prerequisite No. 2 to install 3Engines client for the local machine, so that you can use the 3Engines command.
- Then use Prerequisite No. 4 to connect to the 3Engines cloud and start using 3Engines command from the local terminal.
Then you can try a very usual command such as
but it will not work. If there were load balancer “in front of the cluster”, it would work, but here there isn’t so it won’t. The rest of this article will show you how to still make it work, using the fact that the master node of the cluster has its own load balancer for kube-api.
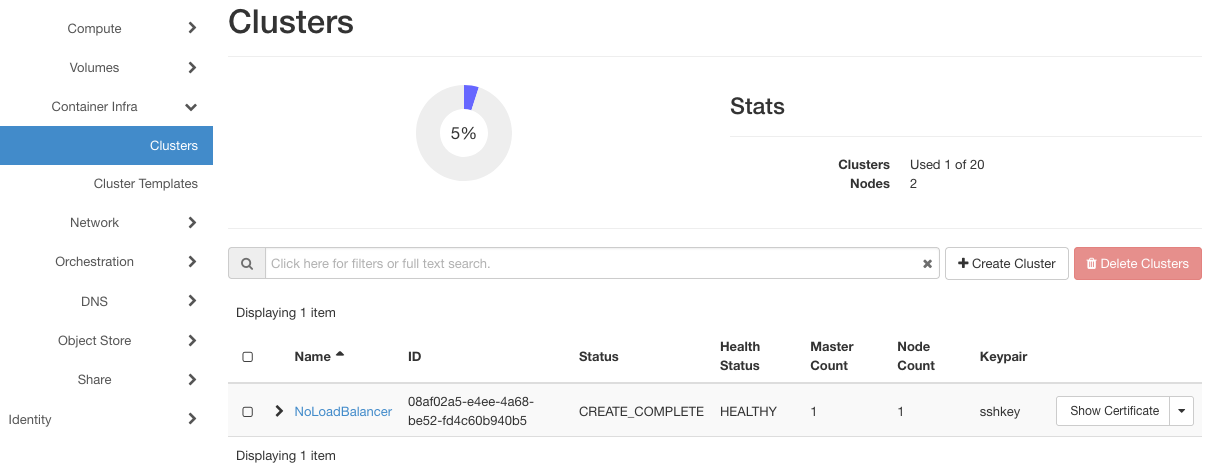
Step 1 Create a Cluster With One Master Node and No Load Balancer🔗
Create cluster NoLoadBalancer as explained in Prerequisite No. 3. Let there be
- one master node and
- no load balancers (do not check field Enable Load Balancer for Master Nodes in subwindow Network).
- Use any key pair that you might have – it is of no concern for this article.
- Activate NGINX as Ingress controller
The result will be creation of cluster NoLoadBalancer as seen in this image:
To illustrate the problem, a very basic command such as
to list the pods in cluster NoLoadBalancer, will show an error message like this one:
Addresses starting with 10.0… are usually reserved for local networks, meaning that no access from the Internet is enabled at this time.
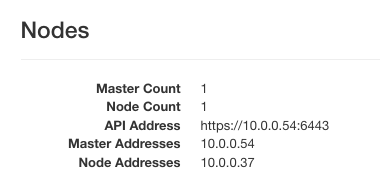
Step 2 Create Floating IP for Master Node🔗
Here are the instances that serve as nodes for that cluster:
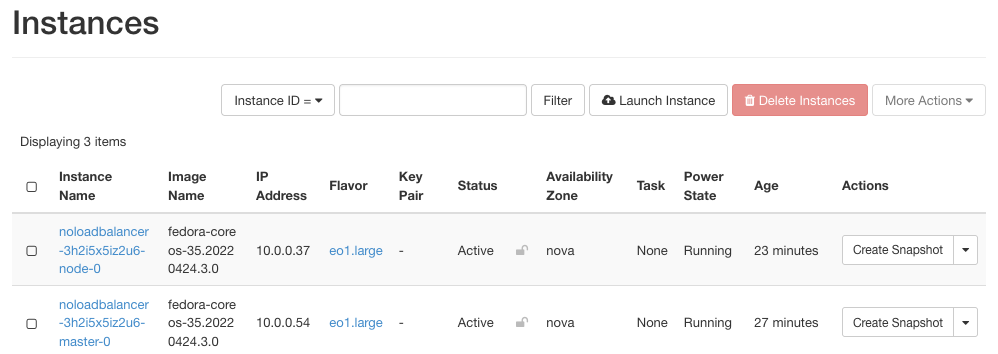
Master node is called noloadbalancer-3h2i5x5iz2u6-master-0 and click on the right side of its row and click option Associate Floating IP.
To add the IP, click on a selection of available addresses (there may be only one but in certain cases, there can be several to choose from):
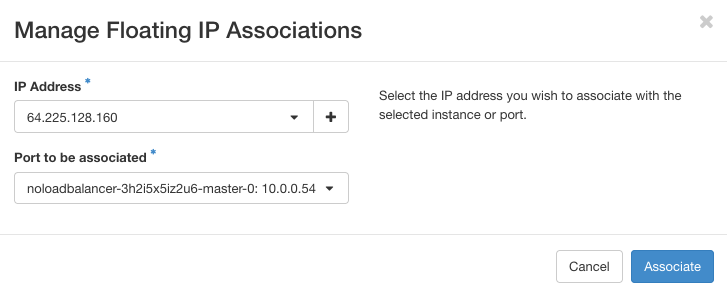
This is the result:

The IP number is 64.225.135.112 – you are going to use it later on, to change config file for access to the Kubernetes cluster.
Step 3 Create config File for Kubernetes Cluster🔗
You are now going to connect to NoLoadBalancer cluster in spite of it not having a load balancer from the very start. To that end, create a config file to connect to the cluster, with the following command:
It will return a row such as this:
Execute this command from terminal command line. A config file has also been created at that address. To show its contents, execute command
assuming you already are in the required folder.
Config file will look a lot like gibberish because it contains certificates, tokens and other rows with random content, some of them hundreds of characters long. Here is one part of it:
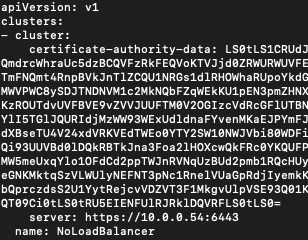
The important row here is this network address:
Step 4 Swap Existing Floating IP Address for the Network Address🔗
Now back to Horizon interface and execute commands Compute -> Instances to see the addresses for master node of the NoLoadBalancer cluster:

There are two addresses:
Incidentally, the same 10.0.0.54 address is also present in the config file, ending with port address :6443.
Try now in terminal to execute kubectl command and see the result, perhaps like this one:
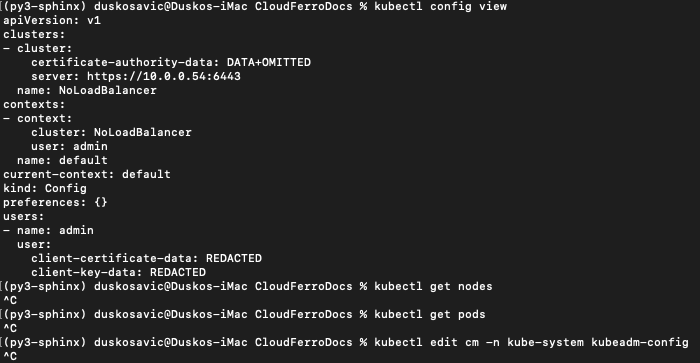
The access is there but the nodes and pods are still out of reach. That is because address 10.0.0.54 is internal network address for the cluster and was never supposed to work as the Internet address.
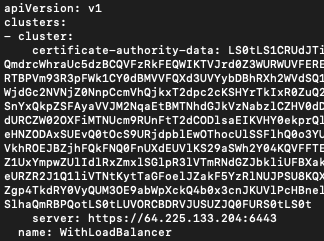
So, open the config file using nano (or other text editor of your choice). Swap 10.0.0.54 for 64.225.135.112 in line for server access. The address 64.225.135.112 is the address of the floating IP for master node and will fit in perfectly.
The line should look like this:
Save the edited file. In case of nano, those will be commands Control-x, Y and pressing Enter on the keyboard.
Step 4 Add Parameter –insecure-skip-tls-verify=true to Make kubectl Work🔗
Try again to activate kubectl and again it will fail. To make it work, add parameter –insecure-skip-tls-verify=true:
Or, try out a more meaningful command
This is the result of all these commands, in terminal window:
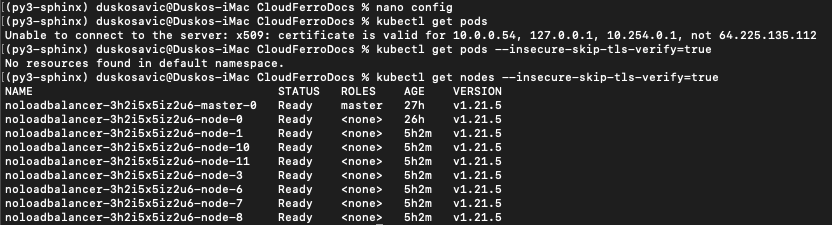
To continue working successfully, use normal kubectl commands and always add –insecure-skip-tls-verify=true in the end.
Attention
Using parameter –insecure-skip-tls-verify won’t check cluster certificates for validity. That will make your https connections insecure. Not recommended for production environment. Use at your own risk, maybe for some local testing or when you are just learning about Kubernetes and clusters.
For production, it is strongly recommended to check on field Enable Load Balancer for Master Nodes when creating a new cluster, regardless of the number of master nodes you have specified.