Deploying vGPU workloads on 3Engines Cloud Kubernetes🔗
Utilizing GPU (Graphical Processing Units) presents a highly efficient alternative for fast, highly parallel processing of demanding computational tasks such as image processing, machine learning and many others.
In cloud environment, virtual GPU units (vGPU) are available with certain Virtual Machine flavors. This guide provides instructions how to attach such VMs with GPU as Kubernetes cluster nodes and utilize vGPU from Kubernetes pods.
We will present three alternative ways for adding vGPU capability to your Kubernetes cluster, based on your required scenario. For each, you should be able to verify the vGPU installation and test it by running vGPU workload.
What Are We Going To Cover🔗
- Scenario No. 1 - Add vGPU nodes as a nodegroup on a non-GPU Kubernetes clusters created after June 21st 2023
- Scenario No. 2 - Add vGPU nodes as nodegroups on non-GPU Kubernetes clusters created before June 21st 2023
- Scenario No. 3 - Create a new GPU-first Kubernetes cluster with vGPU-enabled default nodegroup
- Verify the vGPU installation
- Test vGPU workload
- Add non-GPU nodegroup to a GPU-first cluster
Prerequisites🔗
No. 1 Hosting
You need a 3Engines Cloud hosting account with Horizon interface https://3engine.rootxwire.com/.
No. 2 Knowledge of RC files and CLI commands for Magnum
You should be familiar with utilizing 3Engines CLI and Magnum CLI. Your RC file should be sourced and pointing to your project in 3Engines. See article
How To Install 3Engines and Magnum Clients for Command Line Interface to 3Engines Cloud Horizon.
Note
If you are using CLI when creating vGPU nodegroups and are being authenticated with application credentials, please ensure the credential is created with setting
unrestricted: true
No. 3 Cluster and kubectl should be operational
To connect to the cluster via kubectl tool, see this article How To Access Kubernetes Cluster Post Deployment Using Kubectl On 3Engines Cloud 3Engines Magnum.
No. 4 Familiarity with the notion of nodegroups
Creating Additional Nodegroups in Kubernetes Cluster on 3Engines Cloud 3Engines Magnum.
vGPU flavors per cloud🔗
Below is the list of GPU flavors in each cloud, applicable for using with Magnum Kubernetes service.
- WAW3-1
-
WAW3-1 supports both four GPU flavors and the Kubernetes, through 3Engines Magnum.
Name RAM (MB) Disk (GB) VCPUs vm.a6000.1 14336 40 2 vm.a6000.2 28672 80 4 vm.a6000.3 57344 160 8 vm.a6000.4 114688 320 16 - WAW3-2
-
These are the vGPU flavors for WAW3-2 and Kubernetes, through 3Engines Magnum:
Name VCPUS RAM Total Disk Public vm.l40s.1 4 14.9 GB 40 GB Yes vm.l40s.8 32 119.22 GB 320 GB Yes gpu.l40sx2 64 238.44 GB 512 GB Yes gpu.l40sx8 254 953.75 GB 1000 GB Yes - FRA1-2
-
FRA1-2 Supports L40S and the Kubernetes, through 3Engines Magnum.
Name VCPUS RAM Total Disk Public vm.l40s.2 8 29.8 GB 80 GB Yes vm.l40s.8 32 119.22 GB 320 GB Yes
Hardware comparison between RTX A6000 and NVIDIA L40S🔗
The NVIDIA L40S is designed for 24x7 enterprise data center operations and optimized to deploy at scale. As compared to A6000, NVIDIA L40S is better for
- parallel processing tasks
- AI workloads,
- real-time ray tracing applications and is
- faster for in memory-intensive tasks.
Table 1 Comparison of NVIDIA RTX A6000 vs NVIDIA L40S🔗
| Specification | NVIDIA RTX A60001 | NVIDIA L40S1 |
|---|---|---|
| Architecture | Ampere | Ada Lovelace |
| Release Date | 2020 | 2023 |
| CUDA Cores | 10,752 | 18,176 |
| Memory | 48 GB GDDR6 (768 GB/s bandwidth) | 48 GB GDDR6 (864 GB/s bandwidth) |
| Boost Clock Speed | Up to 1,800 MHz | Up to 2,520 MHz |
| Tensor Cores | 336 (3rd generation) | 568 (4th generation) |
| Performance | Strong performance for diverse workloads | Superior AI and machine learning performance |
| Use Cases | 3D rendering, video editing, AI development | Data center, large-scale AI, enterprise applications |
Scenario 1 - Add vGPU nodes as a nodegroup on a non-GPU Kubernetes clusters created after June 21st 2023🔗
In order to create a new nodegroup, called gpu, with one node vGPU flavor, say, vm.a6000.2, we can use the following Magnum CLI command:
3Engines coe nodegroup create $CLUSTER_ID gpu \
--labels "worker_type=gpu" \
--merge-labels \
--role worker \
--flavor vm.a6000.2 \
--node-count 1
Adjust the node-count and flavor to your preference, adjust the $CLUSTER_ID to the one of your clusters (this can be taken from Clusters view in Horizon UI), and ensure the role is set as worker.
The key setting is adding a label worker_type=gpu:
Your request will be accepted:

Now list the available nodegroups:
We get:

The result is that a new nodegroup called gpu is created in the cluster and that it is using the GPU flavor.
Scenario 2 - Add vGPU nodes as nodegroups on non-GPU Kubernetes clusters created before June 21st 2023🔗
The instructions are the same as in the previous scenario, with the exception of adding an additional label:
where $MASTER_0_SERVER_ID is the ID of the master0 VM from your cluster. The uuid value can be obtained
- in Horizon, through the Instances view
- or using a CLI command to isolate the uuid for the master node:

In this example, uuid is 413c7486-caa9-4e12-be3b-3d9410f2d32f. Set up the value for master handler label:
and execute the following command to create an additional nodegroup in this scenario:
3Engines coe nodegroup create $CLUSTER_ID_OLDER gpu \
--labels "worker_type=gpu,existing_helm_handler_master_id=$MASTER_0_SERVER_ID" \
--merge-labels \
--role worker \
--flavor vm.a6000.2 \
--node-count 1
There may not be any space between the labels.
The request will be accepted and after a while, a new nodegroup will be available and based on GPU flavor. List the nodegroups with the command:
Scenario 3 - Create a new GPU-first Kubernetes cluster with vGPU-enabled default nodegroup🔗
To create a new vGPU-enabled cluster, you can use the usual Horizon commands, selecting one of the existing templates with vgu in their names:
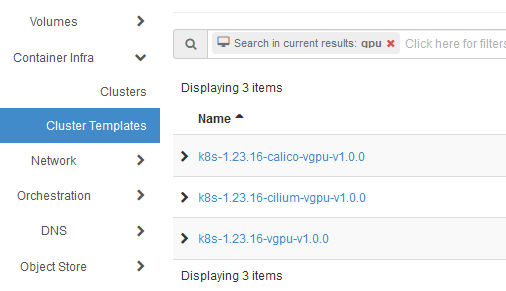
In the below example, we use the CLI to create a cluster called k8s-gpu-with_template with k8s-1.23.16-vgpu-v1.0.0 template. The sample cluster has
- one master node with flavor eo1.medium and
- one worker node with vm.a6000.2 flavor with vGPU enabled.
To adjust these parameters to your requirements, you will need to replace the $KEYPAIR to your own. Also, to verify that the nvidia labels are correctly installed, first create a namespace called nvidia-device-plugin. You can then list the namespaces to be sure that it was created properly. So, the preparation commands look like this:
The final command to create the required cluster is:
3Engines coe cluster create k8s-gpu-with_template \
--cluster-template "k8s-1.23.16-vgpu-v1.0.0" \
--keypair=$KEYPAIR \
--master-count 1 \
--node-count 1
Verify the vGPU installation🔗
You can verify that vGPU-enabled nodes were properly added to your cluster, by checking the nvidia-device-plugin deployed in the cluster, to the nvidia-device-plugin namespace. The command to list the contents of the nvidia namespace is:

See which nodes are now present:

Each GPU node, should have several nvidia labels added. To verify, you can run one of the below commands, the second of which will show the labels formatted:
kubectl get node k8s-gpu-cluster-XXXX --show-labels
kubectl get node k8s-gpu-cluster-XXXX \
-o go-template='{{range $key, $value := .metadata.labels}}{{$key}}: {{$value}}{{"\n"}}{{end}}'
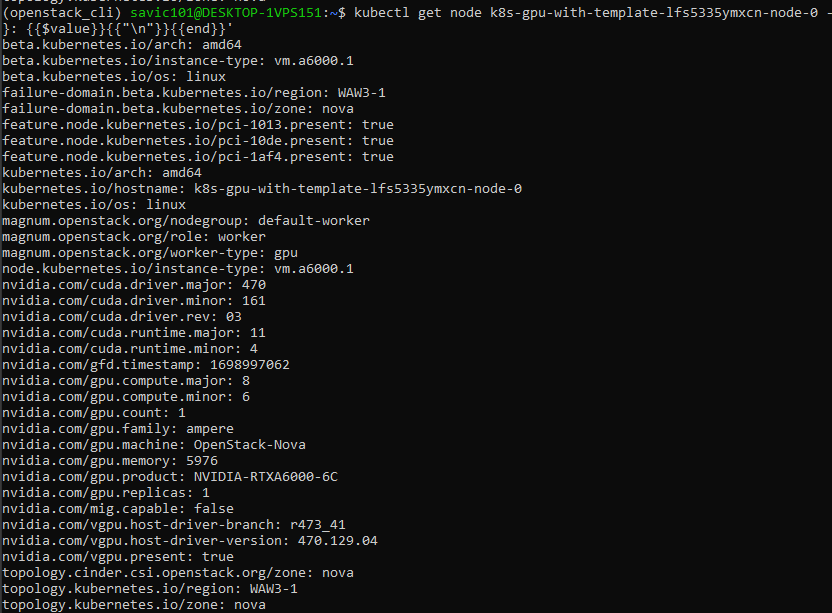
Concretely, in our case, the second command is:
kubectl get node k8s-gpu-with-template-lfs5335ymxcn-node-0 \
-o go-template='{{range $key, $value := .metadata.labels}}{{$key}}: {{$value}}{{"\n"}}{{end}}'
and the result will look like this:
Also, GPU workers are tainted by default with the taint:
This can be verified by running the following command, in which we are using the name of the existing node:
Run test vGPU workload🔗
We can run a sample workload on vGPU. To do so, create a YAML manifest file vgpu-pod.yaml, with the following contents:
vgpu-pod.yaml
apiVersion: v1
kind: Pod
metadata:
  name: gpu-pod
spec:
  restartPolicy: Never
  containers:
    - name: cuda-container
      image: nvcr.io/nvidia/k8s/cuda-sample:vectoradd-cuda10.2
      resources:
        limits:
          nvidia.com/gpu: 1 # requesting 1 vGPU
  tolerations:
  - key: nvidia.com/gpu
    operator: Exists
    effect: NoSchedule
  - effect: NoSchedule
    key: node.3Engines.com/type
    operator: Equal
    value: gpu
Apply with:

This pod will request one vGPU, so effectively it will utilize the vGPU allocated to a single node. For example, if you had a cluster with 2 vGPU-enabled nodes, you could run 2 pods requesting 1 vGPU each.
Also, for scheduling the pods on GPU, you will need to apply the two tolerations as per the example above, That, effectively, means that the pod will only be scheduled on GPU nodes.
Looking at the logs, we see that the workload was indeed performed:
kubectl logs gpu-pod

[Vector addition of 50000 elements]
Copy input data from the host memory to the CUDA device
CUDA kernel launch with 196 blocks of 256 threads
Copy output data from the CUDA device to the host memory
Test PASSED
Done
Add non-GPU nodegroup to a GPU-first cluster🔗
We refer to GPU-first clusters as the ones created with worker_type=gpu flag. For example, in cluster created with Scenario No. 3, the default nodegroup consists of vGPU nodes.
In such clusters, to add an additional, non-GPU nodegroup, you will need to:
- specify the image ID of the system that manages this nodegroup
- add the label worker_type=default
- ensure that the flavor for this nodegroup is non-GPU.
In order to retrieve the image ID, you need to know with which template you want to use to create the new nodegroup. Out of the existing non-GPU templates, we select k8s-1.23.16-v1.0.2 for this example. Run the following command to extract the template ID, as that will be needed for nodegroup creation:
In our case, this yields the following result:

We can then add the non-GPU nodegroup with the following command, in which you can adjust the parameters. In our example, we use cluster name from Scenario 3 (the one freshly created with GPU) above and set up worker node flavor to eo1.medium:
export CLUSTER_ID="k8s-gpu-with_template"
export IMAGE_ID="42696e90-57af-4124-8e20-d017a44d6e24"
3Engines coe nodegroup create $CLUSTER_ID default \
--labels "worker_type=default" \
--merge-labels \
--role worker \
--flavor "eo1.medium" \
--image $IMAGE_ID \
--node-count 1
Then list the nodegroup contents to see whether the creation succeeded:
